“There is more than one way to skin a cat”. PART 1
This phrase deeply applies to how you decide to handle a successful harvest. There are several ways that people like to field dress big game. Sometimes it depends on what animal and where it was harvested at. I earned my buck teeth by the tried and true method of reaming out the butthole and removing the guts and organs. Then getting blood all the way to my shoulders pulling out the wind pipe. This method still works for preparing your animal for processing and cooling the meat. Although effective this method can cost you some time and burn lots of energy just to strip the animal down to pack out or place in a freezer. I learned the gutless method early in my career and have never looked back.
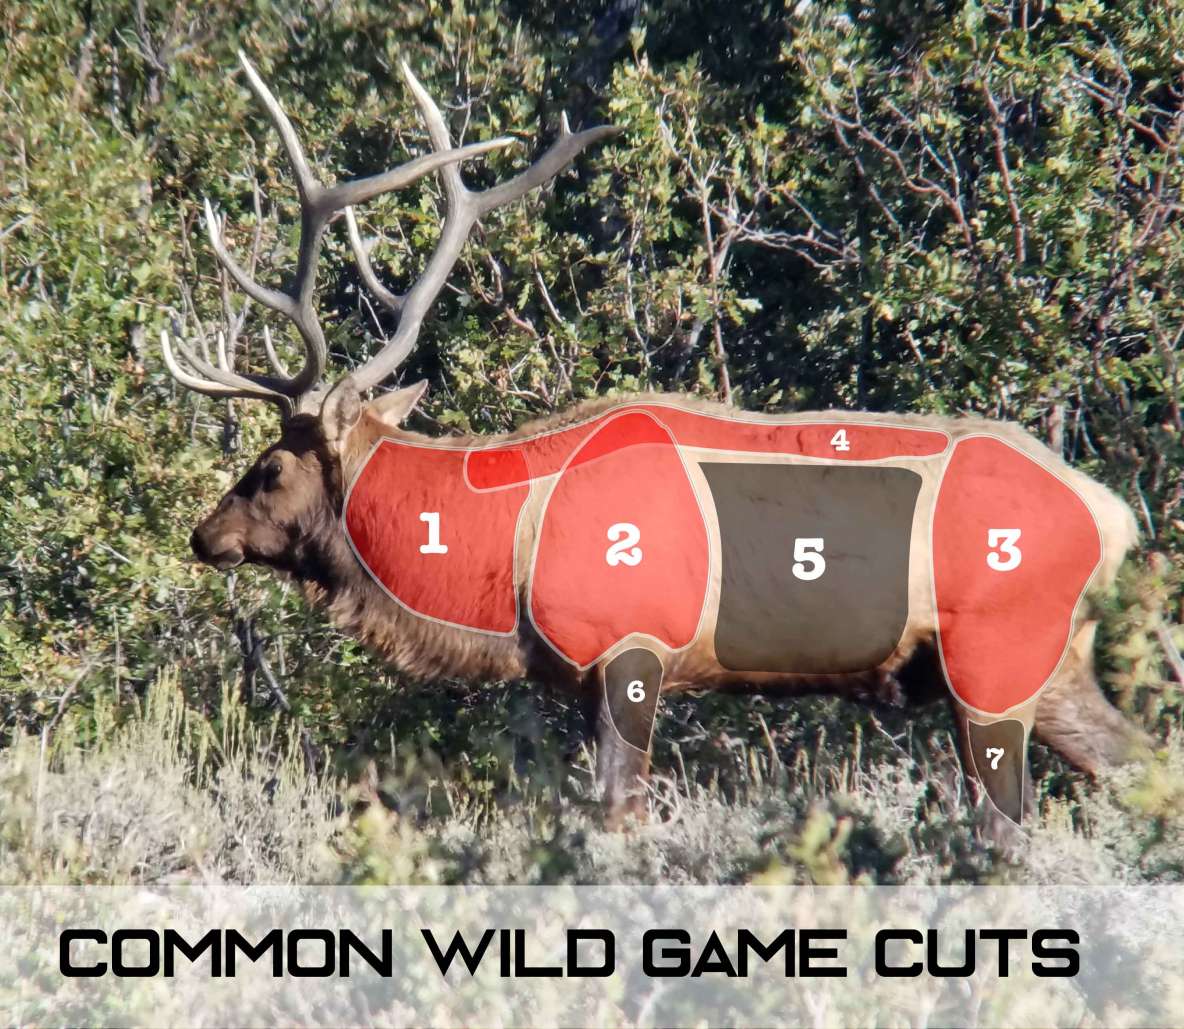
In this diagram you can see the most common types of meat that most bog game have to offer. The Gutless method accelerates the technique for bog game processing and saves you ample energy. Removes the hassle of dealing with nasty guts that could contaminate your meat if not removed properly. In the next few blog posts we will give you a step by step method to break down your animal. Easier, cleaner and a more effective way that most people are using in the field today.

FIRST CUT
Walking up to a downed animal can leave your mind with anxiety or indecision of where to start. Our years of experience will guide you through the process from beginning to end. The first thing you need to decide on, is whether or not you’r going to cape your animal for taxidermy or not. The cuts of meat will be the same but the hide cuts will be slightly different. Once the animals body is positioned on one side, start at the head. Insert your knife at the base of the skull between the ears with the knife blade facing up and away from the body. The tip of the knife pointing down towards the tail almost parallel to the body. Once under the hide work your way under the hide down the center of the body. Use the vertebrae as your guide and continue all the way to the tail. If you have a gut hook style blade then you can reverse position and pull down going with the hair towards the tail.

SECOND CUT
Once the first cut is done, the 2nd cut is about 6-8 inches behind the shoulder. Make a cut perpendicular to the 1st cut and work down the rib cage to the chest area keeping the 6-8 inch rule from the shoulder all the way down. Go as far under the chest towards the other side as possible. This will help connect the opposite side cuts when you flip the carcass and repeat the cuts for the opposite side. After the 2nd cut is complete, start fleshing out the shoulder by pulling the hide out and away from the shoulder. The cleaner you can keep the hide the easier it will be for taxidermy work.

THIRD CUT
The 3rd cut will be fleshing out the hide as far down the shoulder and under the chest as you can go. Also working up the neck at the same time to give you room to remove the front shoulder and first backstrap. Start by turning your knife in a sideway manner and cut the soft tissue thats underneath the hide while pulling it away from the meat. Be careful to not cut into the meat while fleshing the shoulder out. This process is easier with an extra pair of hands to pull the hide while you cut the connective tissue. Work up the neck as far around the side and bottom of the neck as you can safely. Work across the shoulder and down towards the chest area. The farther you can flesh the shoulder and chest will make it easier to make the 4th cut and prep the front leg for removal. When you feel like you cant go any further under the chest or down the shoulder it’s time to start the 4th cut.
FOURTH CUT
The 4th cut is crucial for a taxidermist if you are choosing to go that route. Start by making a 360 degree cut around the knew. Careful when pulling the knife around not to impale yourself with the pressure of the knife. Once the cut is complete, place the tip of the knife under the back of the leg and work towards the rib cage. The area that connects to the chest or arm pit area, is usually soft and can be difficult to cut on a larger animals. Once you get to the armpit area make sure to complete the cut going towards the tail and into the 2nd cut. Go back to the knee and start tubing out the hide around the leg. Again go under the chest as far as you can. Keep the hide as clean as possible when removing it for the taxidermist. Try to keep it facing up so dirt and debris do not stick to the inside of the hide.

Once you get the shoulder and most of the chest area removed of hide you are ready to remove the front leg and backstrap. Check back for the next step to completing the gutless method or click this link to view the next step
